


stair bracket installation instructions
Stair brackets easily installed with adhesive, our stair brackets provide classic architectural detailing to any staircase from sweeping grand rises to modern stair steps. Stair brackets made from high-density furniture grade polyurethane, these finishing touches are exquisitely detailed from hand-crafted molds insuring a quality products every time. All stair brackets come in two sizes and can be finished with either latex or oil base paint
Tools and Material for stair brackets installation
– Sponge or clean cloth
– Caulking gun
– Carpenter’s saw or circular saw
– Elastomeric adhesive caulk
Optional Tools and Material for stair brackets installation:
– Putty Knife
– Hammer an nail set
– 6d or 8d finishing nails (bright finish or electro-galvanized) fasteners must penetrate substrate a min. of 1/2 to 3/4 inches
– Extra fine sandpaper
planning your space for stair brackets installation
Be sure to specify LEFT or RIGHT stair brackets when you place your order The image right shows how to determine “left” and “right” stair brackets (A).
An easy reminder: right brackets “point” to the right and left brackets “point” to the left.
before stair brackets installation
Due to the small size and intricate details of the stair brackets products, we recommend that you finish (paint or faux finish) the product before installation.
After stair brackets installation touch-up any area as needed.
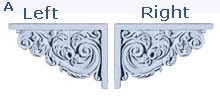
Determine stair brackets orientation – right or left
surface preparation for stair brackets installation
Clean all surfaces free of dirt and loose particles with a clean cloth or sponge.
Make sure area is completely dry before installing stair brackets.
For best results remove the quarter round or half round molding on both vertical and horizontal edges of stair riser (B) Stair brackets should but up to edges.
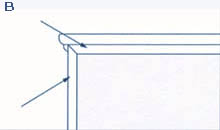
Remove existing 1/4 or 1/2 round molding
Place stair bracket to stair to determine if cutting brackets ends is necessary. Stair bracket should span the vertical and horizontal lengths of riser. If it does not, consider adding quarter or half round molding to stair length (C).
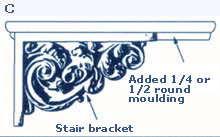
Plan stair brackets horizontal and vertical lengths
general stair brackets installation
Before installing trim stair brackets to size (if necessary) to match tread depth and/or height.
Lay the stair brackets face down on a surface that will not mar the product face, such as a clean cloth.
Apply a 1/2″ continuous bead of latex adhesive/caulk along the stair bracket back edge (D).

Apply continuous bead of adhesive to edges of the stair brackets
Gently press the stair bracket into place. Apply caulk around edge as needed and smooth caulk with your finger or putty knife, giving the appearance of the bracket been part of the wall (E).

Apply pintable caulk around edges of the stair brackets
Wipe off any excess adhesive/caulk with damp sponge.
Option: You may want to tack or secure larger stair brackets into place using finishing nail. If you want to remove nails after adhesive/caulk dries, leave approximately 1/2″ nail exposed for easy removal. TIP: Nail components in ornamentation areas of stair brackets into wall. When adhesive/caulk dries approx. 2 – 3hours)either remove finishing nails or use nail set to countersink nails, making sure that nails penetrate wall at least 1/2″ to 3/4″.
Fill nail holes with adhesive/caulk – smooth the surface with your finger or putty knife. Once caulk is dry and if needed, lightly sand any rough spots with fine sandpaper.
Touch up stair brackets with paint as needed.
when installing a stair brackets always follow this safety suggestions:
Follow good construction practices.
When using power tools, adhesive and finishing materials [such as paint or stain], be sure to follow manufacturer’s instructions.
Always wear safety goggles when using a power tool or hammer.
Always use the right tool and/or equipment for the job.
Century stair brackets function as a decorative elements only, and are not designed to support electrical fixtures or provide any load bearing capacity. InvitingHome.com shall not be responsible if any failure to comply with these installation instructions results in the product failing to perform the purpose intended
manufacturer warranty
Century Architectural Specialties warrants all its products to be free from manufacturing defects for a period of three [3] years from the date of purchase. This warranty does not include damage or other problems resulting from improper installation, misuse or normal wear and tear. Century’s liability is limited to product replacement cost. It does not include freight or handling expenses, installation cost or any other costs or expenses incurred in connection with the purchase or use of our products
